One of my favorite things about a successful hog hunt is the delicious results….MEAT! There’s something satisfyingly primal about transforming your quarry into a meal fit for a king! And a salt cured ham is not only fit for a king, but it hearkens back to the days of hunting past. As we all know, there was no form of refrigeration in years past, and mankind relied upon several techniques for preserving food. One of those methods, cured meats, would provide a lasting protein source throughout the year for the lucky hunter and his family. One of the great byproducts of the curing process is that the meats taste amazing.
When most people in America think of a ham, they think of the sliced, salty, pinkish meat that you can pick up at every local grocery store or deli in the country. The ham that I’m talking about is closer to a delicacy that takes time, wisdom, and patience to be properly enjoyed. You don’t have to be the one with the time, wisdom or patience to enjoy it, but you will need a little bit of all three of these if you are the one making the ham!
In the old world of the Mediterranean region, curing recipes are still closely guarded secrets passed down from father to son. Likewise, in parts of the American heartland, you may be judged and found wanting if you don’t know how to properly salt cure a ham. Many of the old ways, and traditions have been lost because the necessity to learn these skills as a matter of survival no longer exists. Refrigeration, mass transit, commercial grocery stores, and the like have taken the place of the rugged independence required to feed oneself, and one’s family.
I still like to be able to drive down the street to pick up frozen yogurt with the kids. However, I like the feeling I get when I’m able to collect my food from God’s bounty, and still possess the knowledge to preserve, and prepare it for consumption. Not only that, the foodie in me sure likes when it tastes pretty good to boot.
The Stuff you will need:
- At least one wild hog ham (removed from the hog so that the ball joint is exposed). You can also use a domestic ham, but I like my ham to have had a chance to escape.
- A few feet of butchers paper (not freezer paper). I will explain what this is below.
- A mesh ham sock. This can be purchased online. I purchased 20 36″ cotton sockinettes (I’m not sure what makes it a sockinette, and not just a sock, but I digress) on Amazon for under $14.
- An area that will stay between 35 & 40 degrees Fahrenheit. This can be an outside building, or a refrigerated area (which I was lucky enough to have). Some people will use an old refrigerator just for curing meat.
- A kitchen scale.
Ingredients to make the cure:
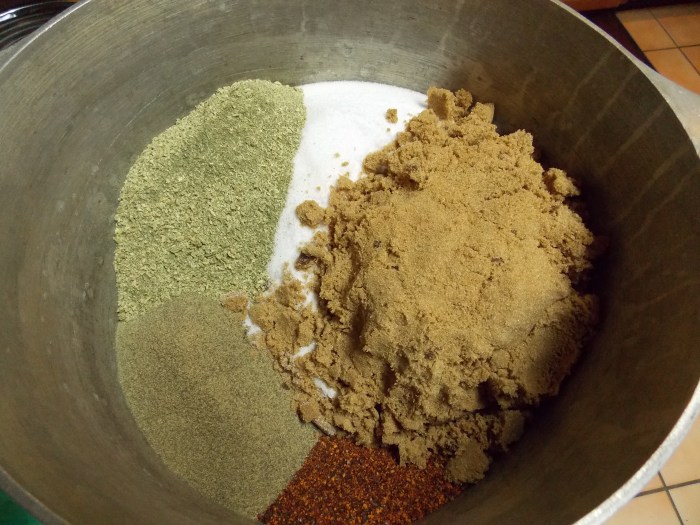
Top Left Dried Celery Powder; Top Center Salt; Top Right Dark Brown Sugar; Bottom Red Pepper; Bottom Left Black Pepper
- 11 oz of dried celery powder
- 8 lbs of non-iodized salt
- 2 lbs of dark brown sugar
- 4/10 lb (6.4 oz) of red pepper
- 4/10 lb (6.4 oz) of black pepper
Meat Preparation:
The first step should be meat collection, but I’m assuming that you have already gone out and harvested a wild hog, or butchered a domestic hog (either variety will work fine for this). To hear the tale of the collection of this particular hog, feel free to check out My Daughter’s First Hunt – Thanksgiving Day Ham, and you will realize that this was quite a special hunt for me, as well as how this beautiful cut of meat met its final demise. As soon as the hog is down, I make it a point to cut its throat, and try to get as much blood out as possible. As soon as you can get your hog’s meat separated from its innards, and on ice, the better tasting meat you will have (this is a good rule of thumb for any meat). When cleaning your hog, make certain to cut out any glands that you find. Try not to touch the gland to any part of the meat if possible. Also if you have cut through a gland with your knife, clean the knife before continuing the butchering process. I believe why most people think wild hog tastes…well…wild is because they are not properly preparing the meat, or most notably removing the glands from the meat.
Once on ice, if you are worried about your hog having a gamey flavor, then add about 3/4 cup to 1 1/4 cup of white vinegar, and 1.5 cup to 2 cups of lemon juice to the ice chest (this depends on the size of your ice chest). I find that this helps with a few things. First, the acid in the vinegar and lemon help to tenderize the meat. Second, it helps to prevent certain types of bacteria, or other nasties from forming. Third, it helps to remove any gamey flavors from the meat. And finally, it will also help to break down any bloodshot portions of meat. Don’t go crazy with the stuff, we aren’t making pickles here, just enough to be able to get a faint whiff of it with your face next to the ice. After a day, drain every drop of fluid out of the ice. Pack with fresh ice (the meat should always be submerged in ice). This process can be repeated a second or even a third time until the water drains off clear. If I’m making a ham, I usually sock them up the day after the hog is killed, so one soak is all mine get, and it seems to be just fine. Note if the meat has a blueish darker color, it isn’t spoiled, it is because you’ve used too much vinegar. The meat is fine (it just looks like you killed a giant smurf). Remove the ham from the ice, and rinse with cool clean water, and pat dry. Set aside the ham and mix up your cure.
Weighing the ham:
Easy enough…weigh the ham. Write this figure down, because it will determine the cure time. If you don’t have a kitchen scale, then you can use a bathroom scale. Simply weigh yourself before and after holding the ham. Subtract the heavy from the light, and you have your ham weight.
Mixing the cure:
 This part is pretty fun. All you do is measure out the ingredients listed above by weight, and mix them together thoroughly. A note here about the cure used in this article. I wanted to come up with a cure that did not use nitrates obtained from not natural sources (i.e. commercial curing salts, sodium nitrate and/or sodium nitrite). After conducting some research, I found that certain plants contain large amounts of nitrates that occur naturally. Celery is one of those plants that contains large amounts of naturally occurring nitrates. You can use dried celery (which can usually be acquired at your grocery store, or on the web) in the place of commercially available nitrates used in the curing process. The nitrates contained in the cure will kill or render harmless any botulism bacteria (Clostridium botulinum). Obviously, botulism is not something you want to mess with, so having a form of naturally occurring or synthesized version of nitrates in the cure is important. I am not a chemist, and this recipe is for my use and consumption. I am using this recipe at my own risk. If you choose to use any portion of it then you do so at your own risk. There are commercially available cures on the market for purchase, so use one if you do not feel comfortable using this recipe.

The cure all mixed up
This recipe makes enough cure to do quite a few hams, so if you are only doing a ham or 2, then you may wish to half the recipe.
Packing the ham with cure:
Next, you will cut a piece of butchers paper large enough to lay your ham on it. You must use butchers paper, not freezer paper. The difference is that freezer paper has a wax layer preventing moisture from escaping. Butchers paper is more like a brown paper bag, where moisture can just leak through. You want that to happen here as the salt in the cure pulls out moisture, it will leak out of the butchers paper. Again, this can be purchased online (I got a huge roll on Amazon), or at your local butcher shop.

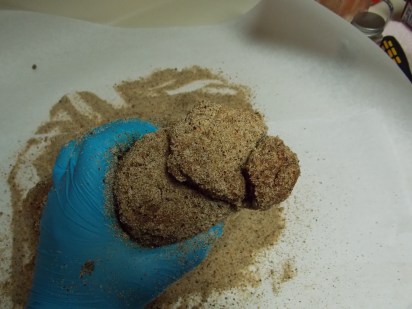
Mashing out any excess blood
Then you will mash down on the ham working your hand from the hock side of the ham to the ball joint trying to push any blood out of the artery running the length of the ham (femoral artery). There is a chance that if there is blood left in this part that it could introduce off tasting flavors, or possibly spoil the ham.

Here you can see the femoral artery is clear of any blood.

Trim any unwanted fat from the top part of the ham. You will lay a bed of cure mix out on the butchers paper roughly 1/4″ to 1/2″ thick, and lay your clean ham down.

The hock separated, before being packed with cure mixture.
Next, with your finger separate the bone, and tissue at the hock end of the ham. Then, with as much cure as will fit, pack the hock with cure. Some people cut an incision in the joint above the hock and pack cure in around the joint to help draw as much moisture as possible from the joint.
The hock after being packed with cure.
Anyone who has cured a bone in ham will tell you that if it is going to spoil, then at the hock (the part where the foot has been removed from the ham) or at joint is where it will spoil, so cram that cure in there boys! This is critical. This is a spot to pay special attention, so don’t slack on the cure at this critical area.
Then, lay the ham out, and pack a healthy layer of cure all on the outside of the ham until all external surfaces are covered.

Cure mixture added all over.

My daughter holding the paper while I sock it up
Wrap the butchers paper around the ham, then slide the sockinette over the ham. This is critical. Always make sure that when you put the ham in the sock that the seam on the sock (the bottom of the sock) is the hock side. In other words you will always hang the ham hock side down when curing. This is to allow the hock to drain properly, and not have anything that is draining from the joints pool up in the hock and spoil. Remember, if the ham is going to spoil, then this is the area in which it will more than likely do it.
After that, just smooth out the butcher’s paper beneath the sock, and attaching a label with the weight of the ham, the date, and any other information you wish to include.
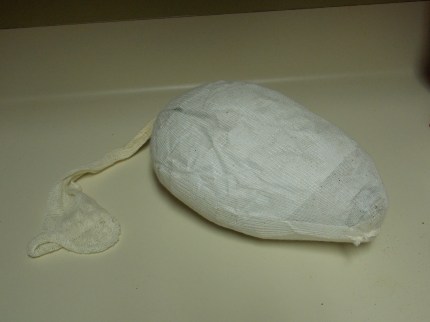
All sacked up and ready to party!
On the card I include my name, and if it was a boar or sow, so I can judge the flavor later. At this point your ham is ready to be hung to cure. In my case, it’s in a cooler that several guys were nice enough to let me use. In many parts of the country, around late November or early December is cool enough to hang hams in a space that insects or other critters can’t get to.
Curing Time:
You should allow your hams to cure for approximately 2 1/2 days per pound of ham. So in my case with an average weight of ham at around 8.5 lbs, my curing time will be roughly 21-22 days although I may give it a little longer. If the temp drops below freezing, then do not count that day towards the curing time. In other words, add a day to the curing time for every day the ham is at or below freezing.

Our ham starts the aging process in the cooler set to 38 degrees F. Notice it is hanging hock down.
Now, keep in mind that this is a country cured ham, and not prosciutto. For instance, Prosciutto di Parma which is made from certain heritage pigs from one of eleven areas in Italy is meant to be sliced very thin, and eaten without cooking. Prosciutto di Parma is to cured meat what Leonardo da Vinci is to the renaissance. To the contrary, country dry cured ham, whether it be cold smoked or non-smoked, should be cooked prior to consumption. However, country cured hams are made in virtually the same manner as Italy’s prosciutto.
Next time we will remove the ham after the curing process is done, and learn how to “shuck the ham.”

Leave a comment